
Resolving a Plumbing Vent Roof Leak Before Water Spreads
A plumbing vent roof leak almost always stems from a cracked rubber collar, damaged flashing base, or degraded sealant around the roof penetration. Professional roofers resolve the leak through a systematic approach:
- Locate the entry point in the attic to confirm water tracks along the outside of the pipe stack rather than leaking from an interior plumbing joint.
- Inspect the roof surface around the pipe for cracked rubber collars, loose fasteners, or torn underlayment.
- Loosen surrounding shingles to remove the compromised flashing assembly.
- Install a new, durable vent boot over a protective waterproof membrane, sliding the top flange under the upslope shingles and over the lower course.
- Fasten and seal the base according to manufacturer standards to withstand heavy wind-driven rain.
In Brevard County, FL, the combination of intense year-round sun, high humidity, and heavy summer downpours makes pipe penetrations a frequent leak point on residential roofs. Every drain in your home connects to a vent pipe that extends through the roof deck to regulate air pressure and exhaust sewer gases safely outside.
Because these pipes pierce through your roof deck, they rely on a specialized flashing boot to seal the opening. Over time, constant sun exposure and thermal expansion break down flexible boot materials, allowing rainwater to seep into your attic insulation and ceiling drywall.
Identifying the Root Causes of a Plumbing Vent Roof Leak
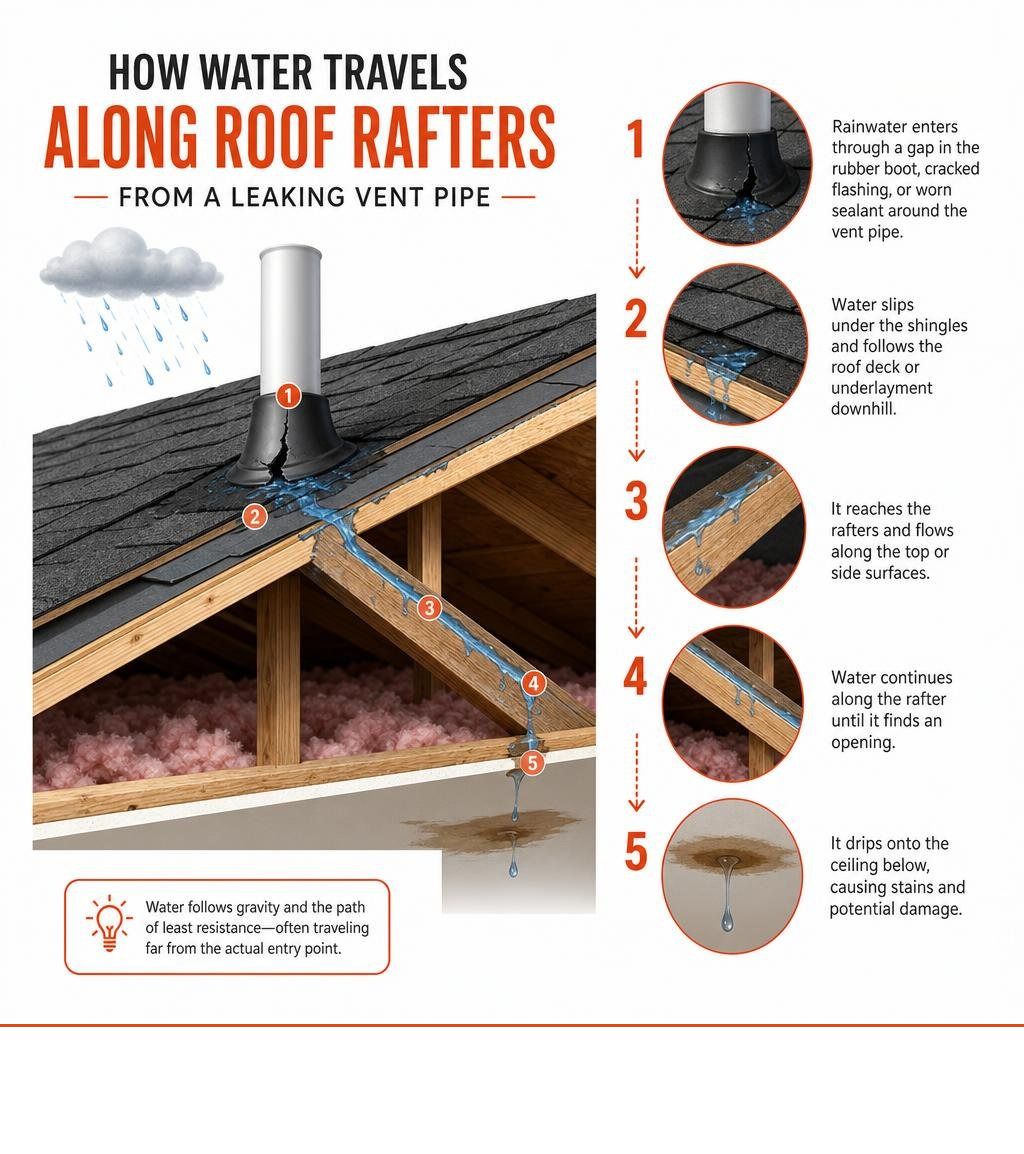
Every roof penetration creates a vulnerability in the building envelope. A substantial portion of residential roof leaks develop around flashings and roof penetrations rather than the main field shingles. The plumbing vent stack—often made of PVC or cast iron—penetrates the roof deck and requires a watertight transition collar to shed rainwater safely across the roof plane. Manufacturer guidance on how to spot and prevent roof vent pipe leaks reinforces that damaged vent-pipe flashing and collars are common leak sources homeowners should have evaluated promptly.

When evaluating water intrusion, understanding the importance of flashing in roofing is essential for long-term protection. Standard plumbing boots feature a flat metal or plastic base combined with an EPDM or neoprene rubber collar gasket. Over time, environmental stressors in coastal Central Florida accelerate the breakdown of these materials:
- Intense UV Degradation: Relentless solar radiation bakes flexible rubber gaskets, causing the material to dry out, lose elasticity, chalk, and eventually split.
- Differential Thermal Expansion: EPDM rubber expands and contracts at a different rate than PVC piping. This daily thermal movement creates micro-gaps between the pipe wall and the gasket.
- Extreme Heat and Storm Runoff: High roof-surface temperatures followed by sudden tropical rain cool materials rapidly, stressing sealant seams. Furthermore, penetrations installed lower on the roof slope intercept larger volumes of sheet runoff, accelerating wear.
Rubber Boot Deterioration vs. Storm Collar Failure
A traditional plumbing vent boot relies on a tight rubber compression seal around the pipe. When the rubber collar cracks or pulls away from the vertical stack, water effortlessly tracks down the pipe exterior directly into the roof cutout.
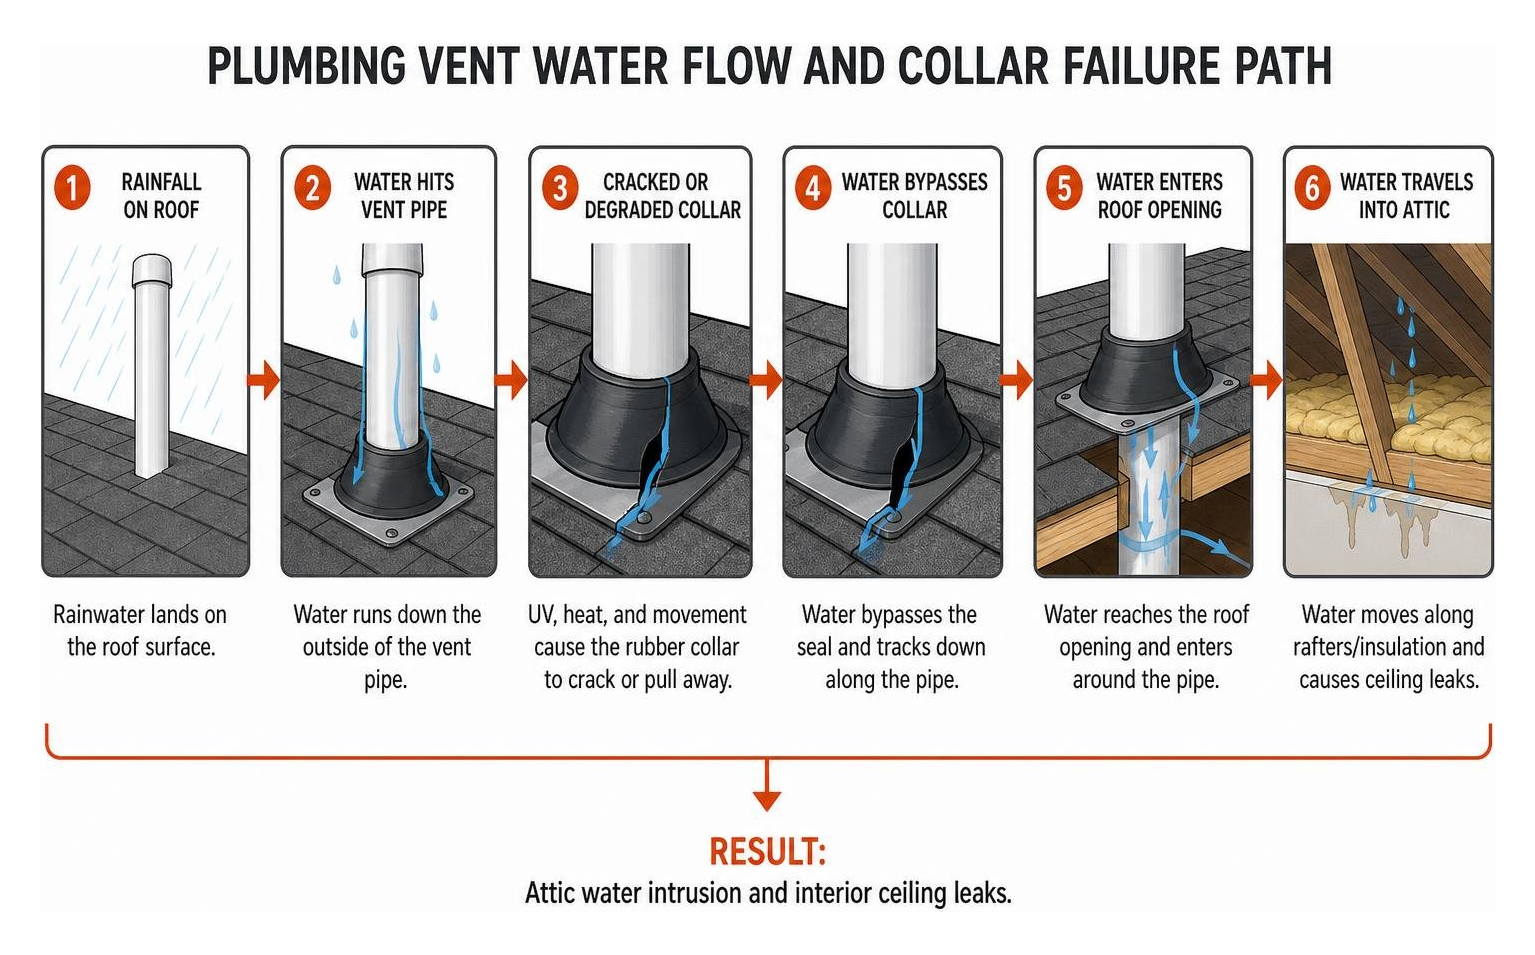
In higher-wind environments across the Space Coast, a storm collar provides a secondary metal umbrella clamped tightly above the primary boot gasket. When storm collars become loose, corroded from coastal salt air, or were omitted during construction, heavy wind-driven rains bypass the primary seal. Proper installation according to established flashing guidelines ensures redundant protection against moisture entry.
Fastener Failures and Improper Installation Shortcuts
Improper installation remains a leading reason why roof penetrations fail prematurely. A common shortcut involves cutting shingles hastily around a vent pipe and applying heavy layers of roofing cement or caulk rather than integrating an approved flashing flange beneath surrounding courses. Topical sealants break down quickly under sunlight and thermal movement, leading to hidden water paths.
Additionally, standard smooth roofing nails securing the flashing base can work loose over time. As severe winds buffeting the roof create micro-movements, fasteners may back out slightly, creating small puncture holes that channel water directly through the deck. In some cases, local wildlife or rodents may chew on softened lead or rubber collars, accelerating structural leaks.
How to Spot Early Warning Signs Before Major Water Damage Occurs
Catching penetration leaks early prevents costly structural repairs. Because water naturally flows along the path of least resistance—often tracking down rafters, truss chords, or horizontal pipe offsets—the physical water stain on a ceiling may appear several feet away from the actual roof vent.
Homeowners can often identify early warning signs from the safety of the ground or inside the home:
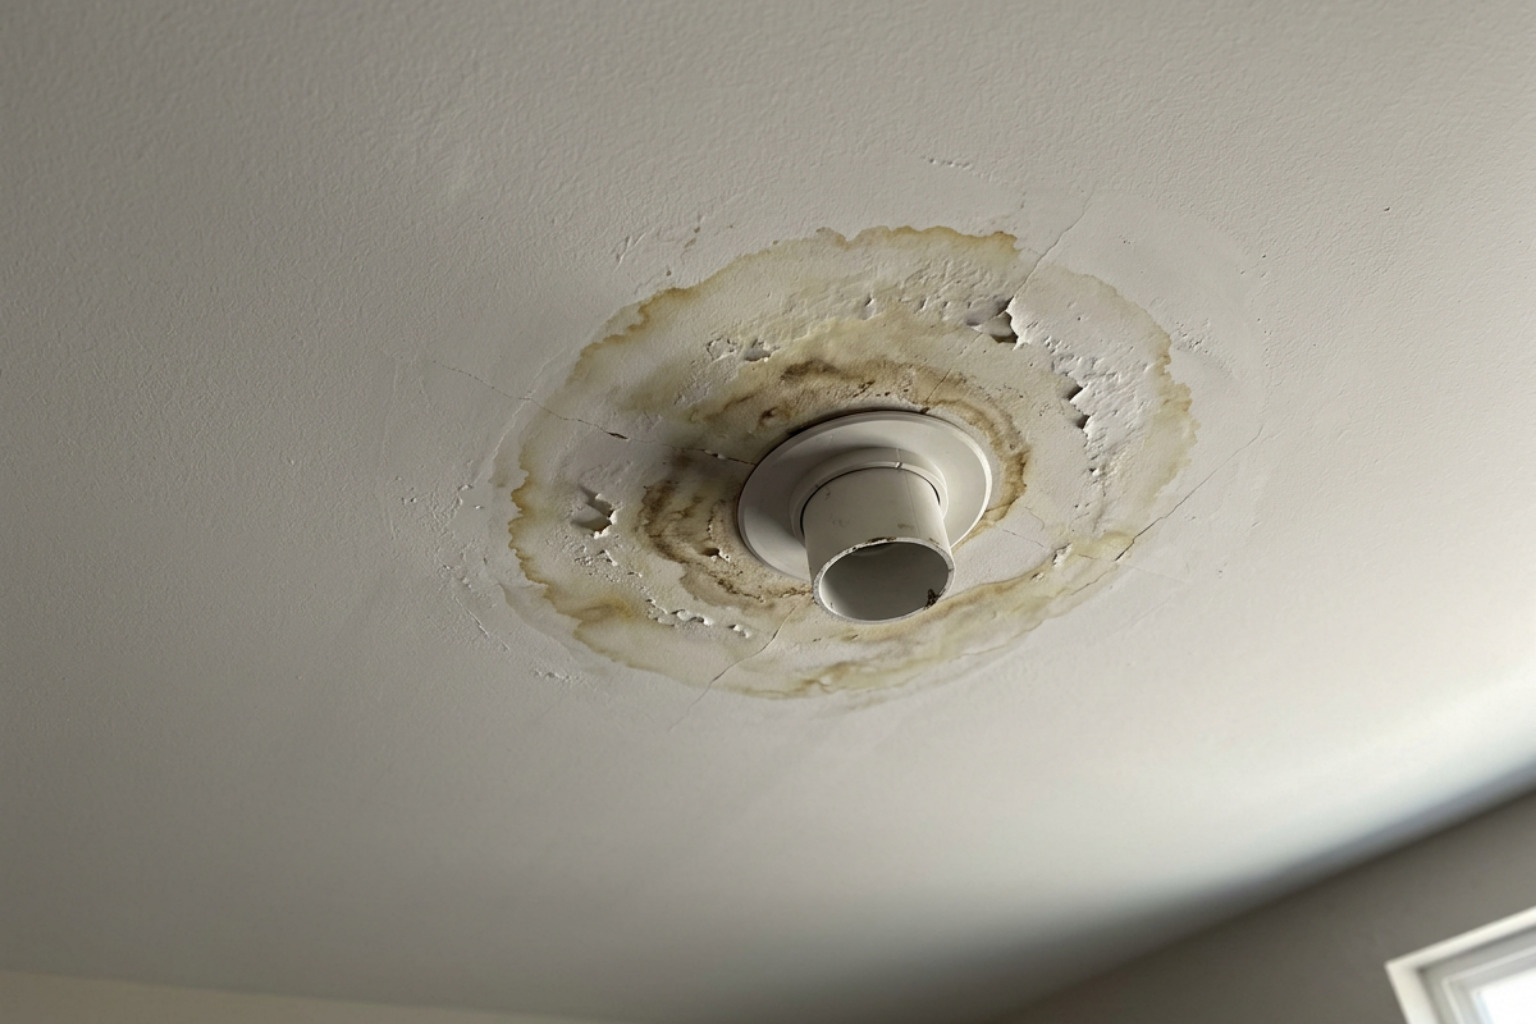
- Dark, ring-shaped water stains on finished drywall ceilings, especially beneath bathrooms or laundry areas.
- Localized musty odors in upper living spaces or near attic access hatches.
- Peeling paint, bubbling drywall compound, or discolored interior finishes along walls.
- Visible daylight around the vent pipe when inspecting the attic space from the hatch during sunny periods.
- Saturated, discolored insulation surrounding the vertical stack in the attic.
If subtle moisture signs appear, professional diagnostic services such as roof leak detection and repair in Melbourne can pinpoint the precise entry point using non-invasive tools like thermal infrared imaging.
Diagnosing an Active Plumbing Vent Roof Leak vs. Pipe Joint Failure
When ceiling stains appear near a vent line, it is critical to determine whether the issue is exterior rainwater intrusion or an interior drain-waste-vent plumbing defect.
Plumbing vent stacks are open to the sky and intentionally receive small amounts of direct rainfall, which safely drains through the household waste line. However, if an internal PVC joint was improperly cemented, or if a cleanout plug cracked beneath the roofline, internal moisture will escape during rainstorms.
Professional contractors evaluate these issues using controlled isolation protocols:
- Internal Pipe Flow Evaluation: Introducing controlled water directly into the center of the open vent pipe tests the integrity of interior plumbing fittings without wetting the exterior roof.
- Flashing and Deck Surface Isolation: Carefully applying water exclusively to the exterior base and surrounding shingles verifies whether the roof flashing seal has failed.
- Pneumatic or Smoke Testing: If hairline cracks are suspected within the attic pipe run, licensed professionals can deploy smoke or pressure tests to confirm whether sewer gases and condensation are escaping into the attic framing.
The Hidden Costs of Ignoring a Plumbing Vent Roof Leak
Allowing a minor leak to persist can quickly turn a straightforward flashing replacement into an extensive structural repair. Water entering around a vent stack saturates roof sheathing, causing the wood to soften, delaminate, and rot.
Furthermore, mold can colonize wet organic building materials within 24 to 48 hours of sustained moisture exposure. Wet fiberglass or cellulose insulation loses significant thermal resistance (R-value), reducing home energy efficiency and driving up cooling costs. When moisture issues arise, knowing how to handle urgent roof repair minimizes long-term property impact.
The Professional Plumbing Vent Flashing Replacement Process
Resolving a leaking vent stack requires proper roofing workflow, strict safety precautions, and precise integration with the roof’s waterproofing layers. Professional roofing technicians follow structured safety standards, using fall protection equipment, stable staging, and specialized tools to avoid damaging brittle shingles.
A critical element of any durable repair is the moisture barrier beneath the shingles. A thorough review of understanding roof underlayment highlights how high-temperature self-adhering membranes protect penetrations during severe weather events.
Materials Comparison: Rubber vs. Metal Vent Boots
Choosing the right flashing material depends on the roof style, pitch, budget, and local exposure conditions. Standard rubber boots are common, but premium metal boots offer significantly longer service life in high-UV coastal environments.
| Flashing Boot Material | Typical Lifespan | UV & Heat Resistance | Salt Air / Coastal Resistance | Primary Benefits |
|---|---|---|---|---|
| Standard Neoprene / EPDM Rubber | 10–15 Years | Moderate (susceptible to drying & cracking) | Good | Economical, widely available, flexible sizing |
| High-Grade Silicone / Retrofit Collars | 15–20 Years | High | High | Superior elasticity, durable weather barrier |
| All-Metal with Hand-Formed Lead Collar | 30–50 Years | Exceptional (immune to UV breakdown) | High | Matches the lifespan of premium roofing systems, no rubber gaskets |
| Adjustable Metal Pivot Boots (Gasketless) | 30–50 Years | Exceptional | High | Mechanical pitch adjustment, completely eliminates exposed rubber seals |
Step-by-Step Professional Installation Standards
A proper flashing replacement integrates seamlessly into the complete roofing system:
- Area Preparation and Shingle Separation: Surrounding shingles are carefully unsealed and lifted using a flat pry bar to expose the fastener heads without tearing the surrounding asphalt tabs.
- Removal of Compromised Materials: The damaged boot is removed along with rusted nails, dried mastics, and compromised underlayment surrounding the pipe.
- Deck Inspection and Membrane Installation: The wooden decking is inspected for soft spots or rot. A dedicated patch of self-adhering, high-temperature modified bitumen ice-and-water barrier is applied directly over the deck, extending securely around the pipe perimeter.
- Flashing Integration: The new boot flange is set in a bed of approved exterior sealant. The upper and side edges of the flange are slipped underneath the upslope shingles, while the bottom flange laps cleanly over the lower shingles to ensure natural gravitational drainage.
- Mechanical Fastening and Lap Sealing: Corrosion-resistant roofing nails or gasketed screws secure the flashing base. Surrounding shingles are resealed down with specialized roofing adhesive to prevent wind uplift.
Long-Term Maintenance and Prevention Strategies
Homeowners can avoid unexpected leaks by maintaining a regular inspection schedule. Having your roof evaluated biannually—typically in spring and late autumn—helps catch micro-fissures in rubber collars before rain enters the attic. Reviewing the ultimate guide to roof inspections provides a deeper look into the critical flashing areas professionals assess during routine maintenance.
Key proactive maintenance practices include:
- Visual Ground Assessments: Safely inspect pipe boots from the yard using binoculars to check for visible collar distortion, missing storm collars, or raised flashing corners.
- Simultaneous Boot Replacement: Because all roof flashings are exposed to the same environmental conditions, replacing all pipe boots during a single contractor service visit is far more cost-effective than scheduling separate service calls over multiple years.
- Post-Storm Attic Checks: After major storms with high winds or tropical rainfall, inspect the attic space around plumbing stacks with a bright flashlight to ensure insulation and framing remain dry.
- Keep Surrounding Areas Clear: Trim overhanging tree branches to reduce organic debris buildup around flashing bases, which can trap moisture and accelerate fastener corrosion.
Frequently Asked Questions About Plumbing Vent Leaks
How long does a typical plumbing vent boot last?
Standard EPDM or neoprene rubber boots typically last between 10 and 15 years nationally. However, in intense subtropical climates with elevated UV indexes and frequent thermal cycling, rubber collars often begin to harden and develop hairline cracks within 8 to 12 years. Upgrading to all-metal flashings or heavy lead collars can provide 30 to 50 years of service life, matching the lifespan of the underlying roof system.
Why does my plumbing vent only leak during heavy or wind-driven rain?
An intermittent leak often indicates that water is entering through directional wind pressure rather than a simple vertical drip. If a rubber gasket has a small separation on one side, or if the storm collar is loose, normal gentle showers may drain away cleanly. However, when strong tropical winds drive rain sideways against the stack, water is forced into the seam, traveling beneath the shingles and entering the roof deck.
Should I replace all roof vent boots at the same time?
Yes. If your home was constructed or re-roofed at a single point in time, all plumbing boots have endured identical UV, wind, and thermal exposure. When one boot collar fails, the remaining flashings on your roof are likely near the end of their functional lifespan. Replacing all vent boots in a single contractor visit saves on mobilization labor costs and protects your home against subsequent leaks.
Professional Roof Repairs for Space Coast Homeowners
A failing plumbing vent flashing may seem like a minor cosmetic issue, but unattended water intrusion can rapidly damage attic framing, ruin insulation, and compromise indoor ceilings. Understanding the proper diagnosis, high-performance materials, and code-compliant installation standards ensures your roof remains watertight against severe coastal weather.
For property owners throughout Melbourne, Palm Bay, Rockledge, Viera, Merritt Island, Cocoa, and surrounding Space Coast communities, MLG Roofing provides comprehensive leak detection, roof inspections, and permanent flashing repairs. Whether you need a single penetration sealed, storm damage evaluated, or complete system maintenance, turn to our team for trusted professional roof repair services tailored to protect your home.