
Identifying Hurricane Damaged Roof Shingle Patterns and Storm Distress
To assess a hurricane damaged roof shingle system safely, start with a ground-level perimeter inspection using binoculars to identify missing tabs, creased shingle mats, displaced ridge caps, and excessive drainage granules. Next, check your attic with a flashlight for damp insulation and sheathing stains. If storm breaches are visible, arrange immediate emergency tarping to mitigate interior leaks, document every impact with clear photos for your insurer, and schedule a professional inspection with an experienced local contractor. At MLG Roofing, our team guides homeowners across Brevard County, FL and the greater Space Coast through each stage of post-storm assessment and restoration.
Tropical cyclones generate complex aerodynamic forces that test residential roofing systems. When sustained gale-force winds strike a structure, they separate along exterior planes, creating severe localized uplift pressures. The most vulnerable sections of any roof are the perimeter eaves, rakes, corners, and ridge caps. Shingles in these transition zones experience intense suction forces capable of breaking factory-applied thermal sealant strips.
When a seal strip fails, the asphalt shingle tab lifts and flaps during wind gusts. This repetitive upward bending produces a sharp horizontal crease across the top of the shingle where the fiberglass mat breaks down. In many cases, the wind blows the entire tab off the deck, exposing underlying fasteners and underlayment to torrential rain.
Granule loss is another common consequence of severe weather. The typical residential roof carries more than a ton of protective ceramic granules, which account for roughly one-third of the weight of an asphalt shingle. These mineral granules shield the underlying petroleum-based asphalt mat from intense ultraviolet rays and physical weathering. Tropical storm wind currents, windborne debris, and turbulent rains scour granules loose, depositing them into eave drainage troughs and downspout splash blocks.
Distinguishing sudden storm impact from natural weathering requires a careful review of specific physical characteristics. Scientific analysis on wind uplift mechanisms and shingle distress shows that storm forces create concentrated mechanical failures, while age-related deterioration occurs uniformly across entire roof slopes.
| Defect Type | Primary Cause | Typical Physical Appearance | Storm Related? |
|---|---|---|---|
| Wind Tear / Lift | High-velocity aerodynamic uplift pressure | Broken adhesive seals, sharp horizontal crease marks, torn fastener tabs | Yes |
| Mechanical Impact | Flying storm debris or severe hail | Fractured fiberglass reinforcement, missing granule divots, soft-metal dents | Yes |
| Blistering | Trapped moisture or unvented attic heat | Small, hollow, raised surface bubbles where asphalt boiled or popped | No (Pre-existing) |
| Thermal Cracking | Natural expansion and contraction cycles | Deep vertical or horizontal splits across aged, brittle shingles | No (Pre-existing) |
| Elevated Fasteners | Inadequate initial installation depth | Nail heads protruding upward through the surface of overlapping shingles | No (Pre-existing) |
Wind Uplift vs Hail Impacts on a Hurricane Damaged Roof Shingle
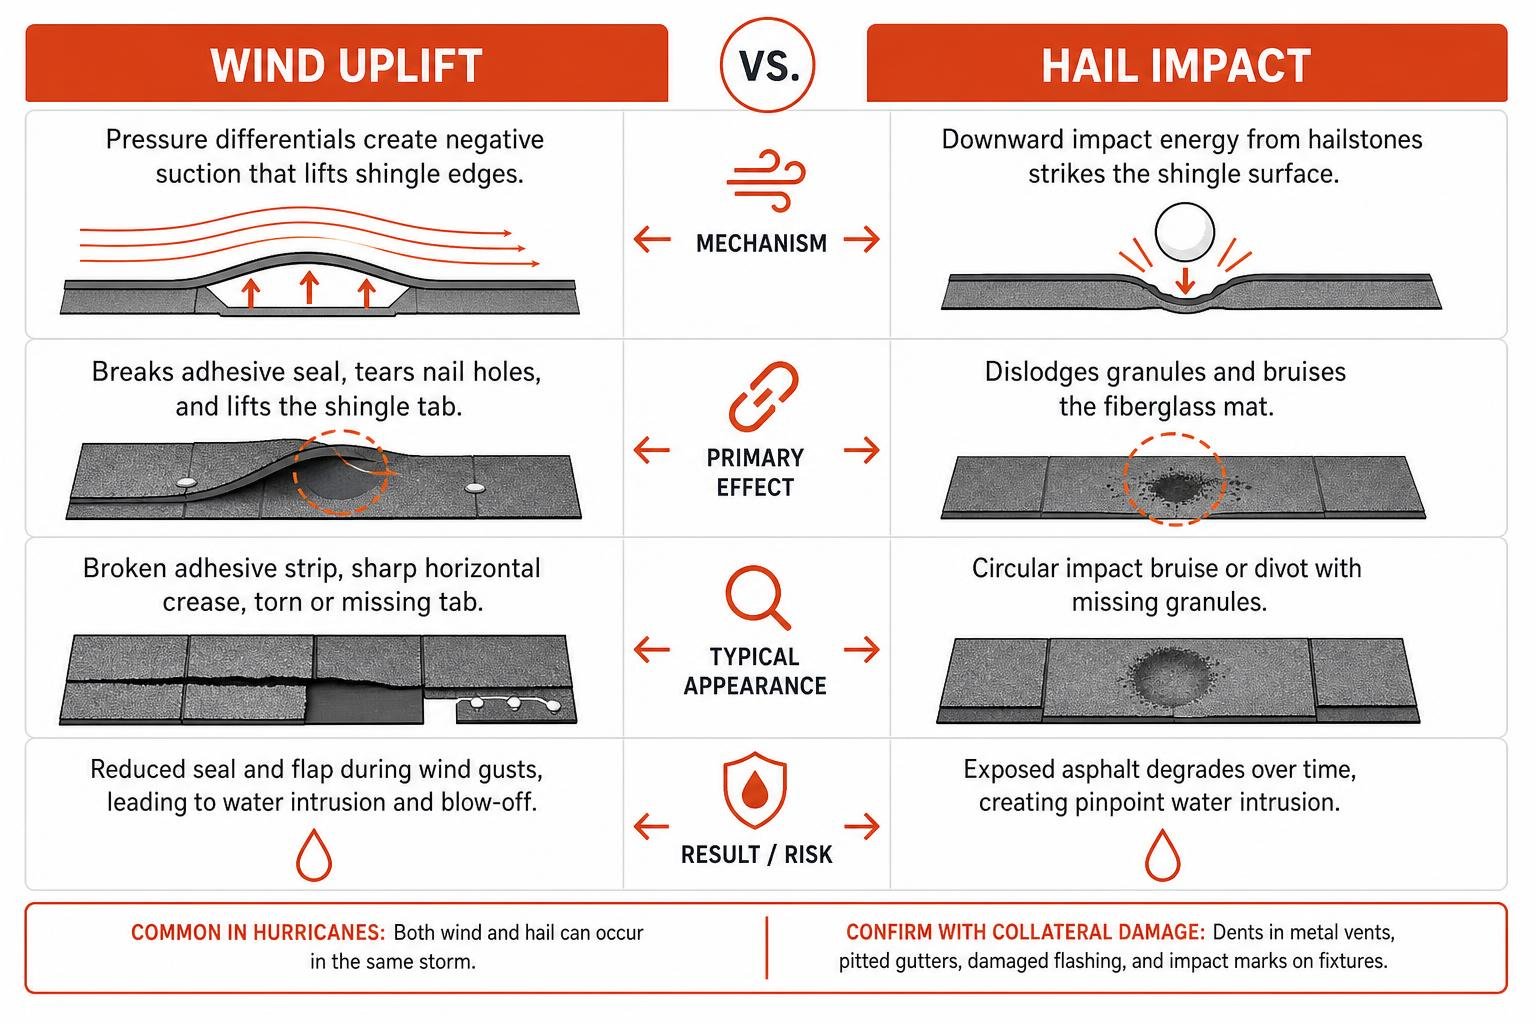
Tropical weather systems frequently bring both severe wind dynamics and localized hail activity. Wind uplift works via air pressure variations; negative suction lifts the lower edges of shingle tabs, weakening the adhesive bonding strip and tearing nail holes. Once unsealed, the shingle loses its ability to shed wind-driven rain effectively.
Hail damage, by contrast, functions through downward impact energy. Hailstones strike the exposed surface, dislodging granules and bruising the internal fiberglass substrate. A hail strike leaves a circular, softened depression where the asphalt mat is crushed. Over time, sunlight degrades the exposed bitumen, creating pinpoint water intrusion spots.
To confirm whether shingle distress stems from a specific storm event, inspectors look for collateral damage to soft metals across the roof. High-velocity winds and hail do not affect asphalt materials in isolation. Collateral evidence on surrounding components confirms the severity of the weather system:
- Dented aluminum or galvanized steel attic ridge vents and box exhaust caps
- Pitted drainage channels, lead pipe boots, and downspout extensions
- Scratched or buckled step flashing along sidewalls, dormers, and chimney transitions
- Splattered impact marks on painted metal roof fixtures and air conditioner housings
Assessing Severity on a Hurricane Damaged Roof Shingle System
The overall stability of an asphalt shingle roof during a tropical event depends heavily on the installation method and fastener schedule. In coastal wind zones, modern residential roofing standards typically require a 6-nail fastening pattern using corrosion-resistant ring-shank nails. Older systems or non-compliant installations often utilize a basic 4-nail pattern with smooth-shank fasteners, which offer substantially less resistance against pull-through under high-velocity wind loads.
When wind suction forces exceed fastener holding capacity, nail heads can pull directly through the asphalt shingle mat. This leaves fasteners anchored into the plywood decking while the shingles detach and blow away. Once the shingle layer peels back, the organic or synthetic underlayment becomes the only barrier protecting the roof sheathing. Homeowners can reference the Brevard County storm damage repair and identification guide when identifying fastener pull-through, structural shifting, and localized decking exposure before small breaches expand into widespread water damage.
Safe Ground-Level Inspection and Hidden Damage Detection

Homeowners should never climb onto a steep, wet, or structurally compromised roof after a severe storm. Damp shingles lose traction, weakened roof decking can give way under concentrated foot traffic, and fallen power lines create severe electrocution risks. At MLG Roofing, we always advise property owners to conduct a safe ground-level visual assessment to gather preliminary observations before contacting professional roofers for on-roof evaluations.
Using high-magnification binoculars, conduct a slow walkaround of the entire residential perimeter. Systematically scan the eaves, valleys, rakes, hips, and ridges from several viewing angles while following a storm damage roof assessment process to check for shingles that are visibly lifted out of alignment, curled upward, or completely missing. Inspect downspout discharge zones for heavy accumulations of loose ceramic granules, which indicate substantial surface erosion from storm winds.
Inspecting the Attic for Concealed Leaks
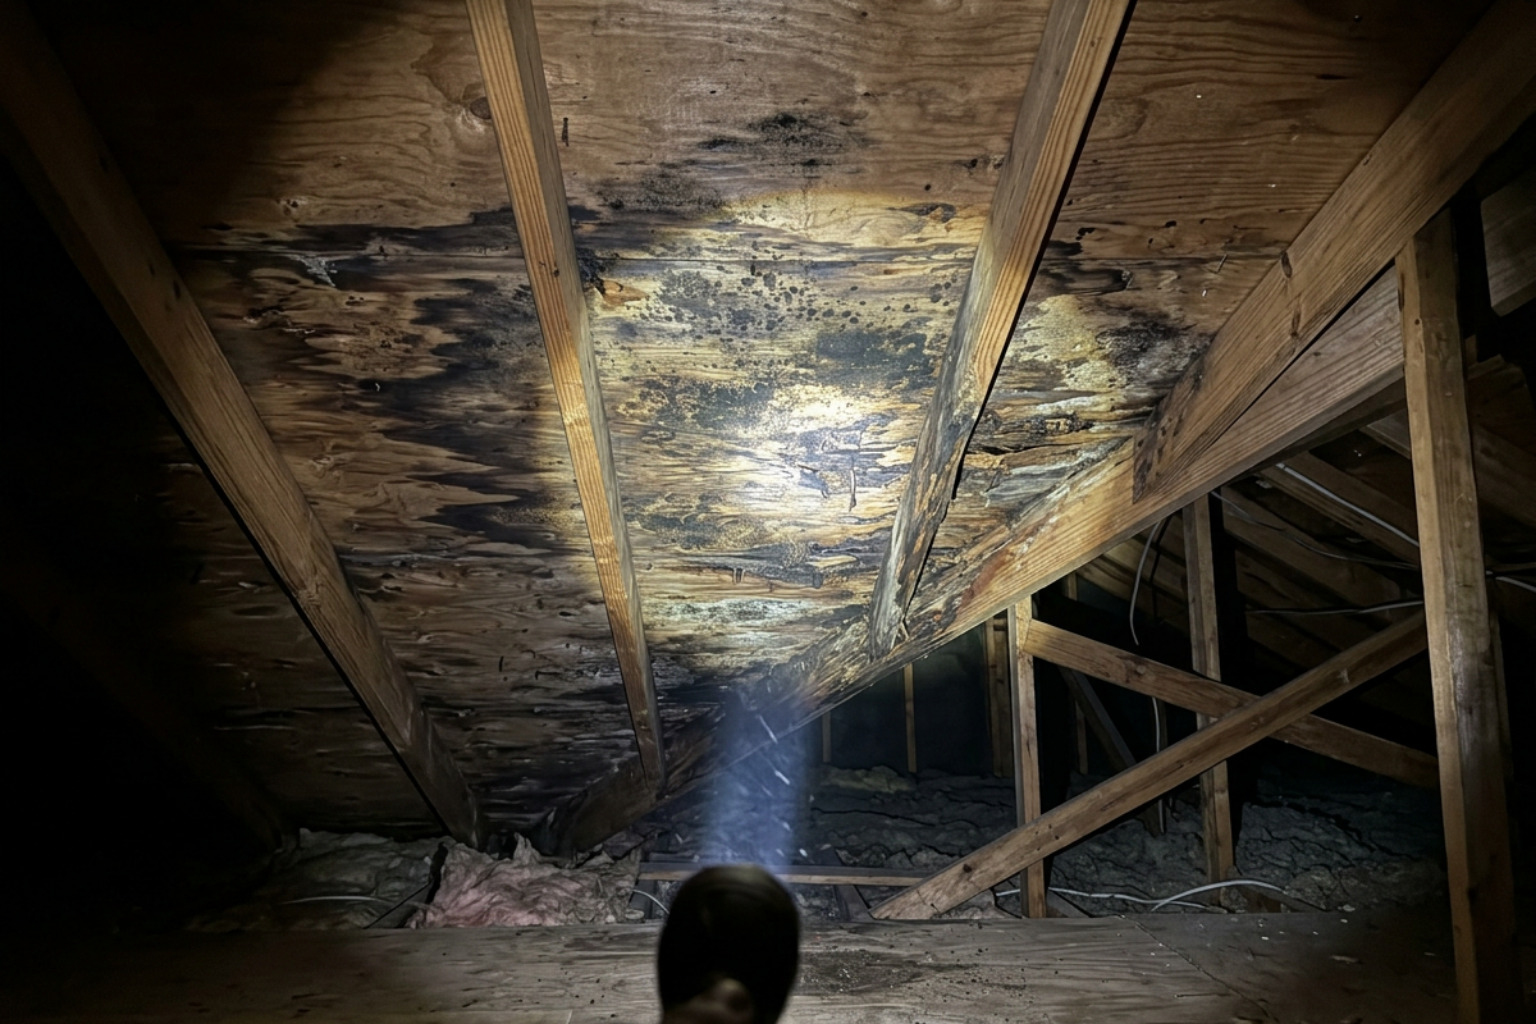
External ground checks only reveal half the story. Wind pressure often drives water underneath shingles through broken seal strips or compromised flashing without displacing the shingles themselves. This trapped moisture migrates into the attic space long before visible water rings appear on interior drywall ceilings.
Conducting an internal attic inspection with a high-powered flashlight is a vital next step. Check the underside of the plywood or OSB roof decking, rafters, and trusses for dark water staining, active moisture drips, or white efflorescence marks. Pay close attention to penetrations around plumbing vent stacks, chimney chases, and roof valley intersections. Inspect fiberglass insulation batt layers directly beneath suspicious decking areas; wet insulation packs down, loses its thermal resistance, and traps moisture against drywall ceilings.
According to guidelines from the EPA and CDC, mold colonies can begin germinating on damp building materials within 24 to 48 hours of water exposure. Identifying concealed attic leaks early stops structural wood rot, prevents severe interior ceiling failure, and mitigates the risk of extensive microbial contamination across the living space.
Immediate Stabilization and Mitigation Next Steps
When storm winds displace shingles and breach underlayment, stopping active water intrusion is an urgent priority. Property owners have an obligation under standard insurance policies to take reasonable measures to mitigate ongoing secondary damage. Allowing water to pour into an unprotected opening leads to saturated framing timbers, ruined ceiling drywall, damaged interior flooring, and widespread electrical hazards.
Professional emergency tarping creates a watertight physical shield over exposed roof decking and damaged shingle fields. Qualified roofing technicians secure heavy-duty, UV-resistant tarps over the roof ridge and anchor them with wooden furring strips. Arranging emergency roof tarping services ensures rainwater flows smoothly over the tarp without catching windward edges or collecting in low spots, protecting the structural integrity of your home until permanent repair materials can be staged.
Temporary Stabilization vs. Permanent Shingle Replacement
Temporary mitigation measures like roof tarps are designed purely to protect the interior during the immediate aftermath of a severe storm. While a properly secured tarp prevents water intrusion for several weeks, it is not a permanent roofing solution. Continued exposure to intense coastal Florida UV radiation, heat cycling, and sudden afternoon thunderstorms will degrade temporary covers.
The decision between completing localized shingle repairs versus a full roof system replacement depends on a comprehensive evaluation of the roof’s condition:
- Damage Extent: Isolated shingle displacement on a single roof slope can often be corrected with localized section repairs, provided the surrounding shingles retain intact adhesive seals and pliable asphalt mats.
- Underlayment and Decking Condition: If water has saturated large sections of roof decking or compromised underlying felt membranes, a full tear-off and replacement is necessary to replace rotted sheathing.
- Roof Age and Material Pliability: Aging shingles on older roofs become brittle under continuous sun exposure. Attempting to bend old shingles to insert new replacement tabs often breaks surrounding shingles, necessitating broader replacement.
- Code Compliance and Permitting: Permitting history, local municipal building codes, and professional inspections determine whether a partial repair is permissible or if a full roof replacement is required by local building departments. MLG Roofing assists homeowners in evaluating roof integrity and selecting the most appropriate, durable repair or replacement pathway.
Navigating Insurance Claims and Selecting a Licensed Contractor
Filing an insurance claim for storm-related roof damage requires meticulous organization and thorough physical documentation. Before cleanup begins, take clear, wide-angle photographs of the entire exterior, followed by detailed close-up images of damaged shingles, torn flashing, dented vents, and interior water intrusion marks. Include a reference object, such as a coin or tape measure, next to physical impacts to provide an accurate scale for adjusters. Homeowners can follow steps to file an insurance roof repair claim to keep claim communications organized.
Under Florida law (Fla. Stat. § 627.70132), policyholders generally have one year from the date of the storm event to file an initial property insurance claim. Prompt notification is critical to ensure timely inspections and avoid potential claim denials based on late reporting. Insurance coverage always depends on your specific policy language, applicable deductibles, covered perils, roof age depreciation, and carrier determinations. If code-related upgrades are required during reconstruction, Ordinance or Law coverage within your policy may assist with those additional expenses.
Choosing a Reputable Local Roofing Contractor
Severe storms inevitably draw transient, unlicensed contractors into affected neighborhoods. These out-of-area operators often solicit work door-to-door, demand substantial upfront cash payments, and perform substandard repairs before disappearing, leaving homeowners without valid warranties or completed building permits. Homeowners can learn how to choose local storm damage roofers to avoid unsolicited door-to-door operators and protect their investment.
Protect your investment by vetting any prospective roofing company thoroughly:
- Verify Licensure and Insurance: Confirm that the contractor holds an active certified roofing license with the Florida Department of Business and Professional Regulation (DBPR) and carries comprehensive general liability and workers’ compensation coverage.
- Demand Written, Itemized Estimates: Reputable local contractors provide clear, written proposals detailing the scope of work, material specifications, fastener schedules, cleanup protocols, and warranty terms.
- Check Local Space Coast Experience: Select established contractors with a physical business presence in communities like Melbourne, Palm Bay, Rockledge, and Merritt Island who understand local wind-borne debris codes and coastal salt-air conditions.
- Review Manufacturer Certifications: Contractors certified by major shingle manufacturers can offer enhanced warranty coverages that protect against high-wind blow-offs and material defects.
When financing unexpected storm repairs, homeowners often evaluate various financial options:
| Funding Option | Repayment Required? | Approval Criteria / Factors | Best Suited For |
|---|---|---|---|
| Home Improvement Financing | Yes (Monthly installment loan with interest) | Credit score, debt-to-income ratio, income verification | Spreading out-of-pocket deductible or upgrade costs over time |
| Home Equity Line of Credit (HELOC) | Yes (Secured loan against property equity) | Available home equity, appraisal, credit standing | Substantial repair or full replacement projects with low interest rates |
| Disaster Assistance Grants | No (Direct financial grant with no repayment) | Household income limits, primary residency, disaster declaration status | Low-to-moderate-income homeowners needing critical storm stabilization |
Grants typically do not require repayment while loans and specialized financing products require scheduled principal and interest payments, making it essential to evaluate your household budget when selecting an option.
Frequently Asked Questions About Storm Damaged Shingles
Can a roof look fine from the ground after a hurricane but still have damaged shingles?
Yes. High-velocity winds often break the thermal adhesive seal strips underneath asphalt shingles without blowing the tabs away entirely. Unsealed tabs lift and flutter during subsequent wind events, allowing wind-driven rain to infiltrate beneath the shingle layer while appearing undisturbed from the ground. A professional physical inspection by MLG Roofing is the best way to verify whether adhesive bonds and underlayment remain secure.
How quickly does water damage and mold develop after shingles blow off?
According to EPA guidelines, mold colonies can begin growing on damp drywall, timber framing, and attic insulation within 24 to 48 hours of moisture intrusion. Water entering through missing shingle tabs can also cause roof decking delamination and ceiling drywall damage if temporary tarping and mitigation are not implemented immediately.
Does homeowners insurance cover roof leaks caused by hurricane winds?
Most standard homeowners policies cover sudden and accidental direct physical losses caused by hurricane wind and wind-driven rain entering through storm-created openings. However, coverage outcomes always depend on your individual policy language, deductibles, exclusions for pre-existing wear, and adjuster determinations. Prompt documentation of all shingle damage and immediate mitigation are essential steps in the claims process.