
Primary Causes of a Solar Panel Roof Leak After Installation
When water finds its way inside after solar installation, the solar modules are almost never the defect. The issue lies where the mounting hardware secures directly to the structural deck. A standard residential installation requires anywhere from 20 to 80 roof penetrations to anchor the racking system, run electrical lines, and secure junction boxes. Every single penetration represents a potential path for moisture if not engineered and sealed according to rigorous standards for roof penetration waterproofing.
In Brevard County, FL, coastal elements amplify minor installation flaws. Wind-driven rains force water upward beneath shingle courses, while continuous UV radiation tests chemical compounds. Understanding why a leak occurs requires examining the mechanical connections, material choices, and the condition of the roof structure beneath the array.
Mechanical Failures That Trigger a Solar Panel Roof Leak
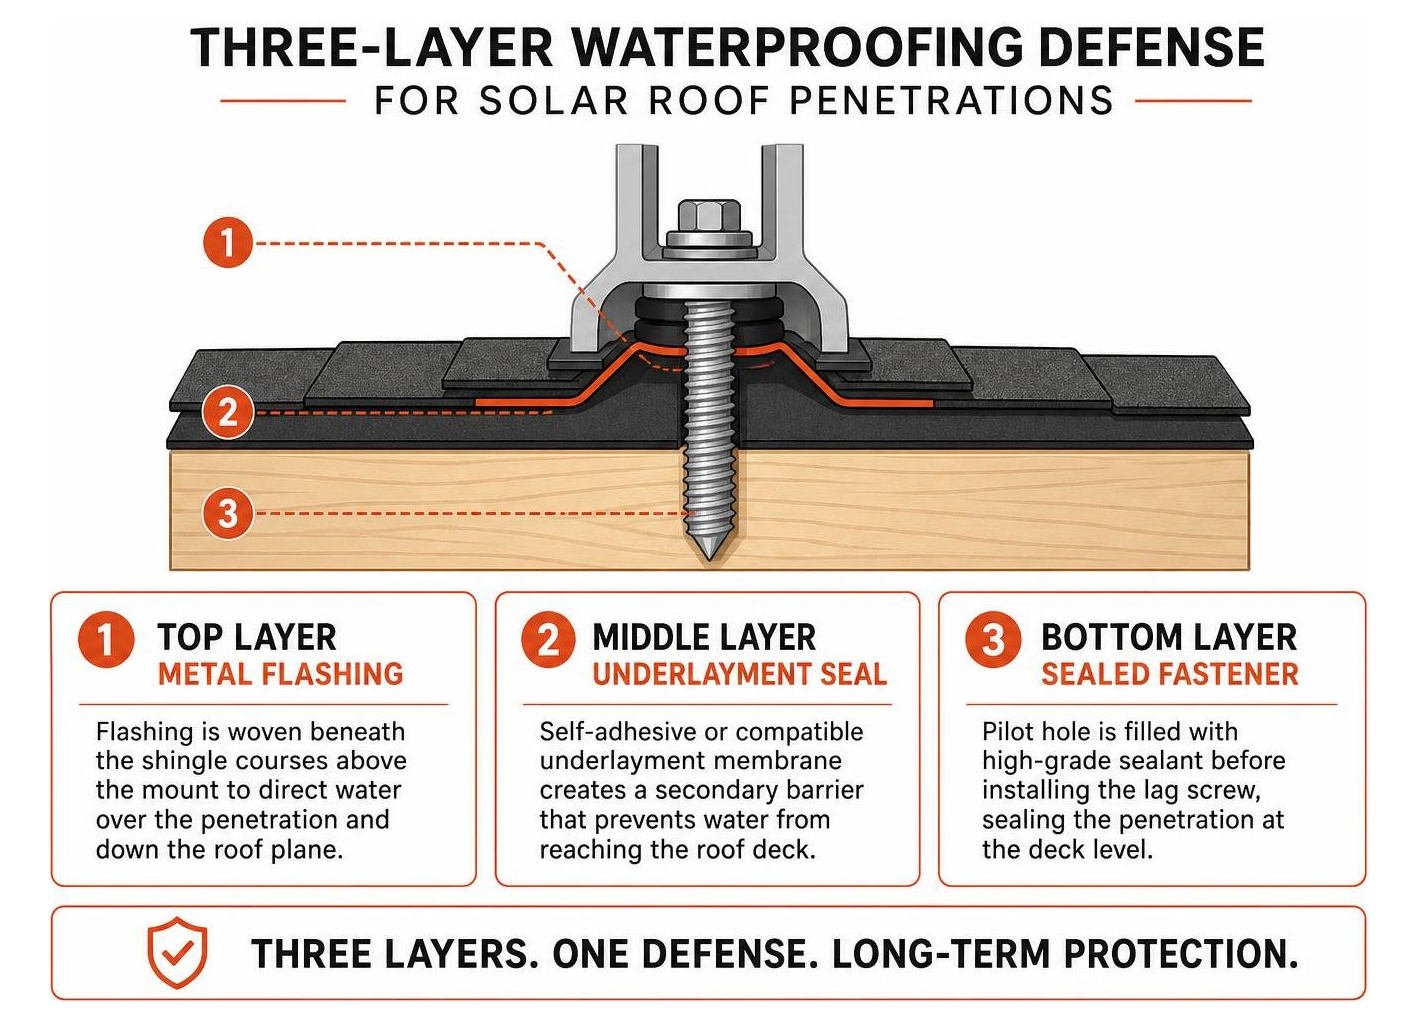
The mechanical connection between a solar foot and a wooden truss is the primary point of failure when workmanship falls short. To secure heavy racking systems against high wind uplift, crews drive heavy lag bolts through shingles, underlayment, and roof decking directly into structural rafters.
Several mechanical errors can lead directly to water infiltration:
- Missing or Inverted Flashing: Proper waterproofing requires metal flashing woven beneath the overlapping shingle courses above the mounting point. Setting flashing flat on top of asphalt shingles or relying solely on a metal bracket allows water running down the roof plane to channel behind the fastener.
- Improper Predrilling and Over-Torquing: Driving lag bolts without properly sized pilot holes can split underlying rafters, weakening the mechanical grip. Conversely, over-torquing bolts with high-power impact drivers crushes EPDM compression washers, warping the metal base and creating an immediate gap for moisture intrusion.
- Pilot Hole Omission of Sealant: Best practices require filling predrilled pilot holes with high-grade sealant before driving the lag screw. When installers skip this step, water that bypasses the upper bracket immediately reaches the raw wood deck.
- Substandard Sealant Selection: Standard silicone or cheap asphalt mastic often breaks down rapidly when exposed to extreme roof surface temperatures. Long-lasting installations rely on advanced tripolymer sealants or polyether-based formulations designed to maintain elasticity across decades of thermal cycling.
Roof Age, Pre-Existing Shingle Decay, and Thermal Movement
Mounting a 25-year solar array onto an aging roof system introduces serious risks. Asphalt shingles lose protective granules, turn brittle, and develop micro-cracks over time. Proactive steps for extending roof lifespan in the intense Florida sun help preserve the underlying deck, but when installation crews walk across older shingles carrying heavy hardware, they can inadvertently crack materials or loosen seal strips.
Furthermore, Florida weather introduces continuous thermal movement. Rooftop temperatures across Melbourne and Palm Bay routinely reach extreme levels during mid-day heat before cooling rapidly during afternoon thunderstorms. This rapid expansion and contraction causes metal racking and wooden roof framing to shift at different rates. If the penetrations were not flashed with flexible materials, these thermal cycles widen fastener gaps, allowing moisture to seep into structural decking.
How to Diagnose Hidden Leaks Beneath Your Solar Array
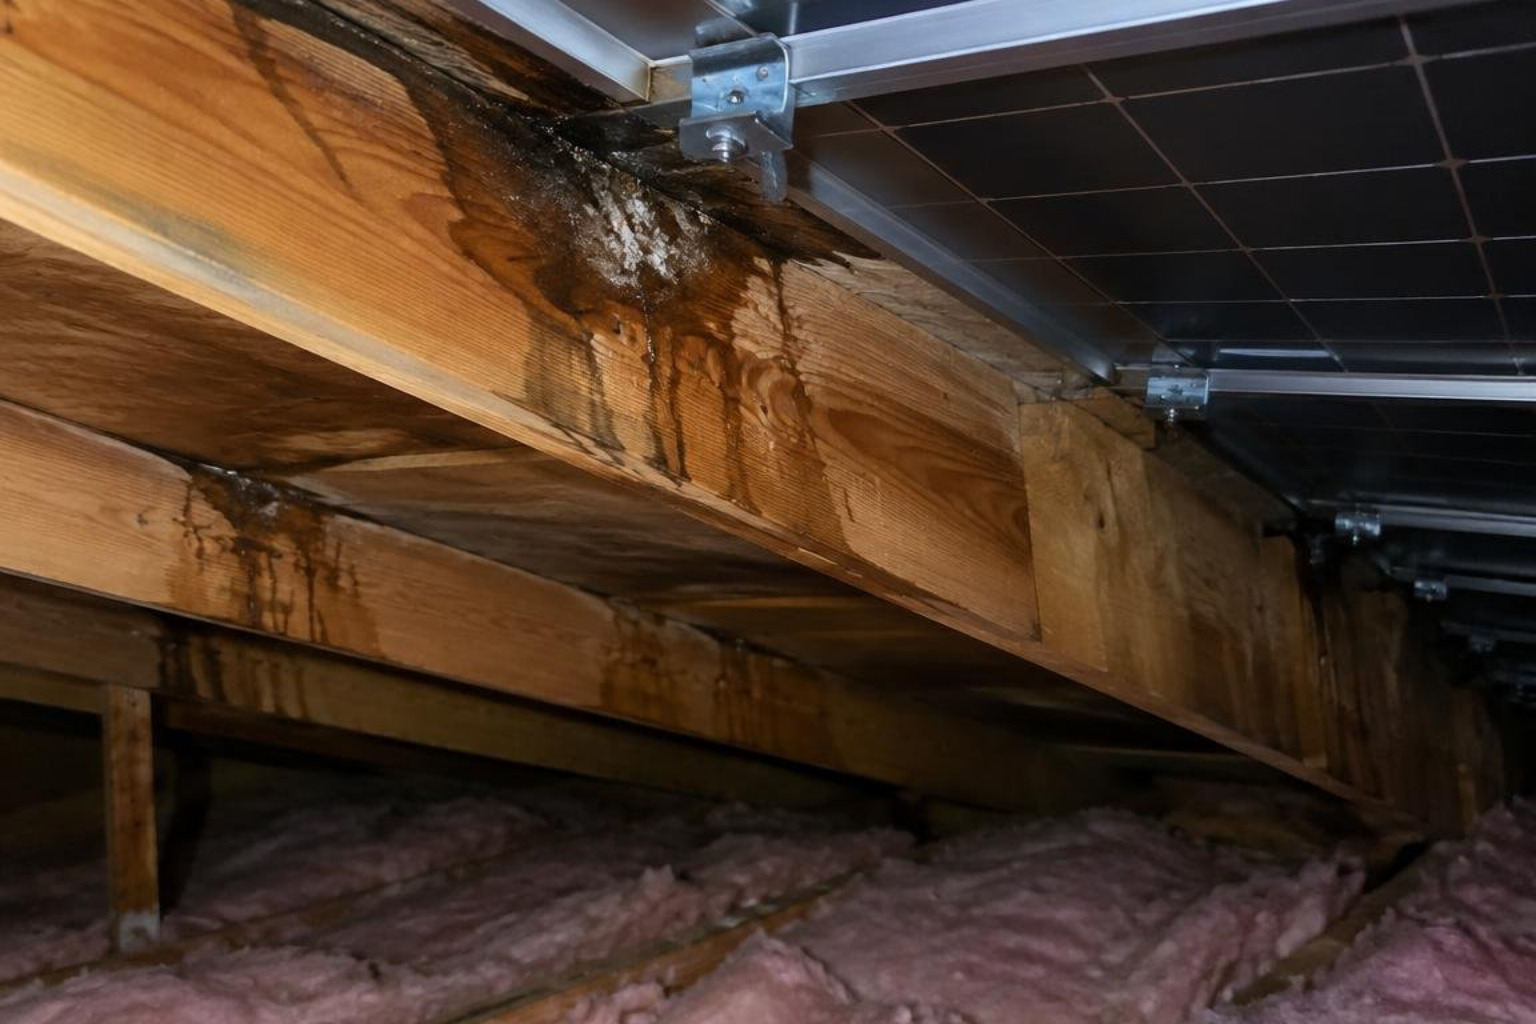
Diagnosing an active leak beneath a solar array requires a methodical approach. Because water follows the path of least resistance—often traveling horizontally along rafters, roof trusses, or electrical conduit before dripping onto drywall—the visible ceiling stain inside a home is rarely located directly below the failed roof penetration.
Locating the true entry point involves combining an interior attic inspection with an exterior evaluation conducted from the roof perimeter or ground level.
Step-by-Step Attic and Interior Diagnostic Inspection
The most accurate diagnostic work happens inside the attic space while tracing moisture backward from the ceiling defect to the roof deck:
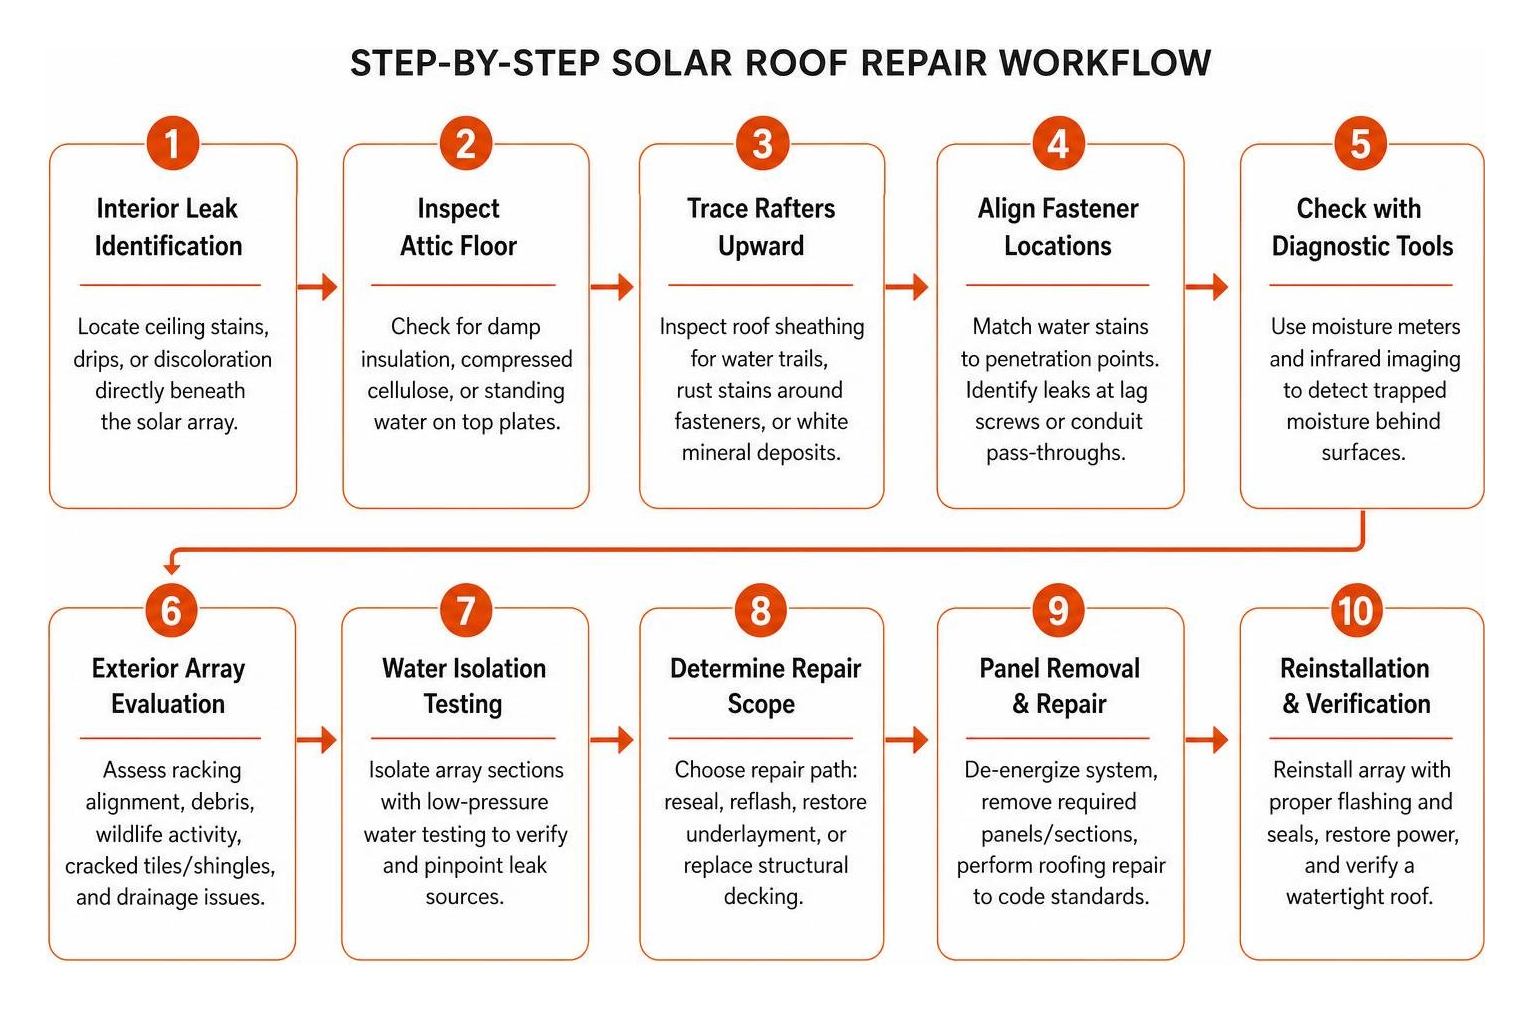
- Map the Ceiling Stain: Measure the distance of the interior ceiling stain from exterior walls to establish a reference point.
- Inspect the Attic Floor: Locate the corresponding area in the attic. Check for damp fiberglass insulation, compressed cellulose, or standing water on the top plate of interior partition walls.
- Trace Rafters and Trusses Upward: Using a powerful flashlight, inspect the underside of the roof sheathing. Look for dark water trails, rust staining around fastener tips, or mineral efflorescence running along the timber framing.
- Align Fastener Locations with Solar Array Footprints: Count the exposed penetration fasteners protruding through the deck sheathing. Identify whether the water stains originate at an individual lag screw penetration or a conduit pass-through point.
- Check with Diagnostic Tools: When moisture is discovered, scheduling urgent roof repair before moisture spreads ensures contractors use moisture meters and infrared cameras to locate trapped water within decking and insulation before framing decays.
Exterior Array and Hardware Evaluation
An exterior diagnostic assessment confirms the physical conditions that allow water to bypass surface layers:
- Racking and Cable Tray Alignment: Misaligned racking can alter natural roof drainage channels, causing water to pool against mounting hardware rather than flowing freely toward the eaves.
- Debris Accumulation: Leaves, pine needles, and storm debris can become trapped beneath the low-clearance space under panels. This organic matter holds moisture against shingle granules and obstructs runoff.
- Wildlife Activity: Birds and squirrels frequently seek shelter beneath solar arrays. Nesting materials trap moisture, and wildlife can chew through protective wiring covers or dislodge flashing edges.
- Tile and Shingle Cracking: On tile roofs common in Viera and Rockledge, foot traffic during panel placement can crack fragile concrete or clay tiles beneath mounting points, breaching the primary water-shedding layer.
- Controlled Water Isolation Testing: When leaks remain elusive, technicians isolate individual array sections using low-pressure water testing to replicate rainfall and verify penetration seals one row at a time.
Professional Repair Process for Array-Related Roof Damage
Repairing a roof leak situated beneath an active solar array requires technical coordination between electrical safety protocols and traditional roofing craftsmanship. Unlike standard roof repairs, access to the affected roof plane is restricted by solar racking, high-voltage wiring, and interconnected module framing.
| Repair Category | Typical Scope of Work | Structural Deck Involvement | Array Detachment Required? |
|---|---|---|---|
| Minor Penetration Reseal & Reflash | Isolating single failed mount, removing surrounding shingles, installing code-compliant metal flashing boot, applying tripolymer sealant. | Minimal (local fastener hole reseal) | Partial (1–2 panels lifted locally) |
| Flashing Replacement & Shingle Weaving | Replacing corroded or incorrectly installed flashing pans across multiple mounting feet; weaving new asphalt shingles into existing courses. | Low to Moderate (fastener relocation) | Moderate (entire string detached) |
| Underlayment Restoration | Removing racking, tearing off localized shingles, installing self-adhering modified bitumen underlayment membrane over exposed deck. | Moderate (surface drying and treatment) | High (full array section removal) |
| Structural Deck Replacement | Cutting out rotted OSB/plywood sheathing, reinforcing damaged rafters, installing new decking, underlayment, shingles, and re-mounting array. | Heavy (framing reinforcement & sheathing replacement) | Complete (full array detach and reset) |
Panel Removal and Reinstallation Protocols
A proper repair cannot be accomplished by attempting to squeeze sealant beneath an intact, low-clearance solar array. The work requires a structured detachment and reinstallation process:
- System De-Energization: Technicians shut down the solar inverter system and disconnect DC rapid-shutdown mechanisms to eliminate electrical shock hazards before tools touch the racking.
- Panel Detachment and Safe Staging: The affected solar modules are carefully detached, labeled for electrical string continuity, and staged on padded ground storage racks away from work zones.
- Racking Hardware Removal: Racking rails and mounting feet are unfastened, exposing the penetration points, damaged shingles, and underlying flashing plates.
- Substrate and Decking Remediation: Compromised shingles are removed. If long-term water intrusion has rotted the plywood or OSB roof deck, the damaged wood is cut out back to the center of adjacent rafters and replaced with fresh sheathing.
- Waterproofing and Shingle Integration: High-temperature self-adhering underlayment is applied over the repair zone. New shingles are woven into the existing field, and properly engineered flashing pans with integrated EPDM gaskets are mechanically secured to structural framing.
- Re-Mounting and Commissioning: Racking is reinstalled using proper torque specifications, panels are re-secured, wiring connections are verified, and the electrical system is safely recommissioned.
Estimated Costs to Repair a Solar Panel Roof Leak
Repair costs for solar-related leaks depend on several site-specific variables rather than a simple flat fee. Because solar panels must be mechanically detached and safely stored before roofers can access the underlying deck, the labor involved is inherently higher than an open-roof shingle repair.
Primary cost factors influencing solar roof repairs include:
- Array Size and Accessibility: Steep-slope roofs, multi-story homes in beachside communities like Cocoa Beach or Satellite Beach, and large arrays require additional staging and safety equipment.
- Extent of Deck and Structural Damage: Catching a leak early may only require localized flashing replacement. Long-term leaks that have rotted deck sheathing, compromised trusses, or saturated attic insulation require extensive carpentry and remediation.
- Electrical Configuration: Microinverter systems, string inverters with DC optimizers, and complex conduit routing dictate the time required for qualified technicians to safely de-energize and reconnect modules.
- Roof Material Type: Repairing asphalt architectural shingles involves different labor requirements than carefully removing, replacing, and re-flashing concrete tile or standing seam metal roofing systems.
- Permitting and Code Compliance: Depending on local building department requirements in Brevard County municipalities, structural repairs or reroofing work may require dedicated building permits and inspections.
When an underlying roof system is past the midpoint of its serviceable lifespan or exhibits widespread shingle degradation, repeated spot repairs around solar mounts can become inefficient. In such cases, coordinating a complete roof replacement with a full panel detach-and-reset offers better long-term reliability than continually patching individual penetration points.
Navigating Warranties, Contractor Liability, and Insurance
When water drips from a ceiling beneath a newly installed solar array, determining financial responsibility and navigating warranty claims can be complex. Identifying which party is responsible depends on clear documentation, the age of the roof, and the specific terms of the contracts in place.
Solar Workmanship Warranties vs. Roofing Warranties
A critical distinction exists between solar equipment warranties, installer workmanship guarantees, and existing roof manufacturer warranties:
- Solar Equipment Warranties: Manufacturers guarantee that panels will produce electricity for extended periods. However, this production warranty does not cover roof penetrations, water damage, or flashing failures caused by the installer.
- Solar Workmanship Warranties: Most reputable solar installation companies provide a workmanship warranty covering roof penetrations for a period typically ranging from 1 to 10 years. If a mounting bolt fails within this window due to improper sealing or missing flashing, the solar contractor is generally responsible for repairing the penetration.
- Roof Manufacturer Warranties: Shingle and metal roof manufacturers warrant their products against material defects. If an outside party drills holes through the roofing material and fails to follow manufacturer-approved flashing specifications, the roof manufacturer may void warranty coverage for leaks occurring around those penetrations.
Homeowners seeking professional guidance on residential roof repairs in Brevard County should maintain a complete documentation file containing pre-installation roof photos, the solar contract, engineering diagrams of mounting locations, and all formal correspondence.
Handling Insurance Claims for Water Damage
Homeowners insurance policies generally distinguish between sudden, accidental water damage and gradual damage resulting from faulty workmanship or normal wear and tear:
- Covered Perils: If a severe windstorm dislodges a solar panel, pulling mounting hardware from the roof and allowing rain to enter the home, insurance policies typically cover the resulting interior water damage and necessary structural repairs, subject to policy deductibles.
- Workmanship Exclusions: If a leak develops solely because an installer failed to install flashing boots or used improper sealant, insurance carriers often exclude coverage for fixing the faulty roof penetration itself, though they may cover resulting interior drywall and flooring damage.
- Subrogation: When an insurance company pays for interior repairs caused by documented installer error, the insurer may initiate subrogation against the solar company’s commercial general liability insurance to recover the payout.
- Ordinance or Law Provisions: If code updates require broader structural upgrades during a major repair, having Ordinance or Law coverage within a property policy can assist with code-mandated improvements.
Maintaining thorough documentation—including date-stamped photographs, moisture readings, and written contractor evaluations—is essential when filing an insurance roof repair claim to ensure adjusters understand the full scope of structural and interior impact.
Frequently Asked Questions About Solar Roof Leaks
Can a leak under solar panels be fixed without removing the array?
In almost all situations, no. The clearance between solar panels and the roof surface is typically only 3 to 6 inches, leaving insufficient space to properly remove damaged shingles, replace underlayment, inspect decking for rot, and weave new metal flashing into the roof system. Attempting to squirt sealant blindly under panels from an extension wand creates an unverified surface patch that frequently fails during heavy rain.
Does installing solar panels automatically void my existing roof warranty?
Installing solar panels does not automatically void an entire roof warranty, but it can limit coverage. Most shingle manufacturers exclude leaks caused by third-party roof penetrations, unauthorized alterations, or improper mounting hardware. If a single contractor licensed in both roofing and solar performs the work, or if the solar installer utilizes manufacturer-certified mounting and flashing systems, the underlying roof warranty remains intact for non-penetrated areas.
How long does a typical solar-related roof repair take?
A straightforward residential repair involving electrical isolation, localized panel detachment, flashing replacement, and system re-commissioning typically takes 1 to 2 days of on-site labor. If water intrusion has remained undetected for months, causing extensive deck rot, rafter damage, or mold development, structural framing repairs and decking replacement may extend the project timeline to 3 to 5 business days.
Conclusion
A solar panel roof leak requires rapid, professional diagnosis to prevent localized water intrusion from compromising structural roof decking, attic framing, and interior living spaces. While solar arrays provide clean energy across Brevard County, every roof penetration must be engineered to withstand coastal humidity, intense thermal expansion, and severe wind-driven rain.
When interior stains or attic moisture appear, avoid temporary surface patches or attempting to manipulate live electrical arrays without professional training. Proper remediation requires tracing the water path, safely isolating and detaching the solar hardware, restoring structural sheathing, and integrating code-compliant flashing into the roof system.
For homeowners in Melbourne, Palm Bay, Rockledge, Viera, and Merritt Island seeking reliable leak detection, structural decking assessment, or full roof restoration, turn to MLG Roofing. Contact our local specialists today to schedule an evaluation with our dedicated professional roof repair services.