
How a Traditional Peg Tile Roof Works
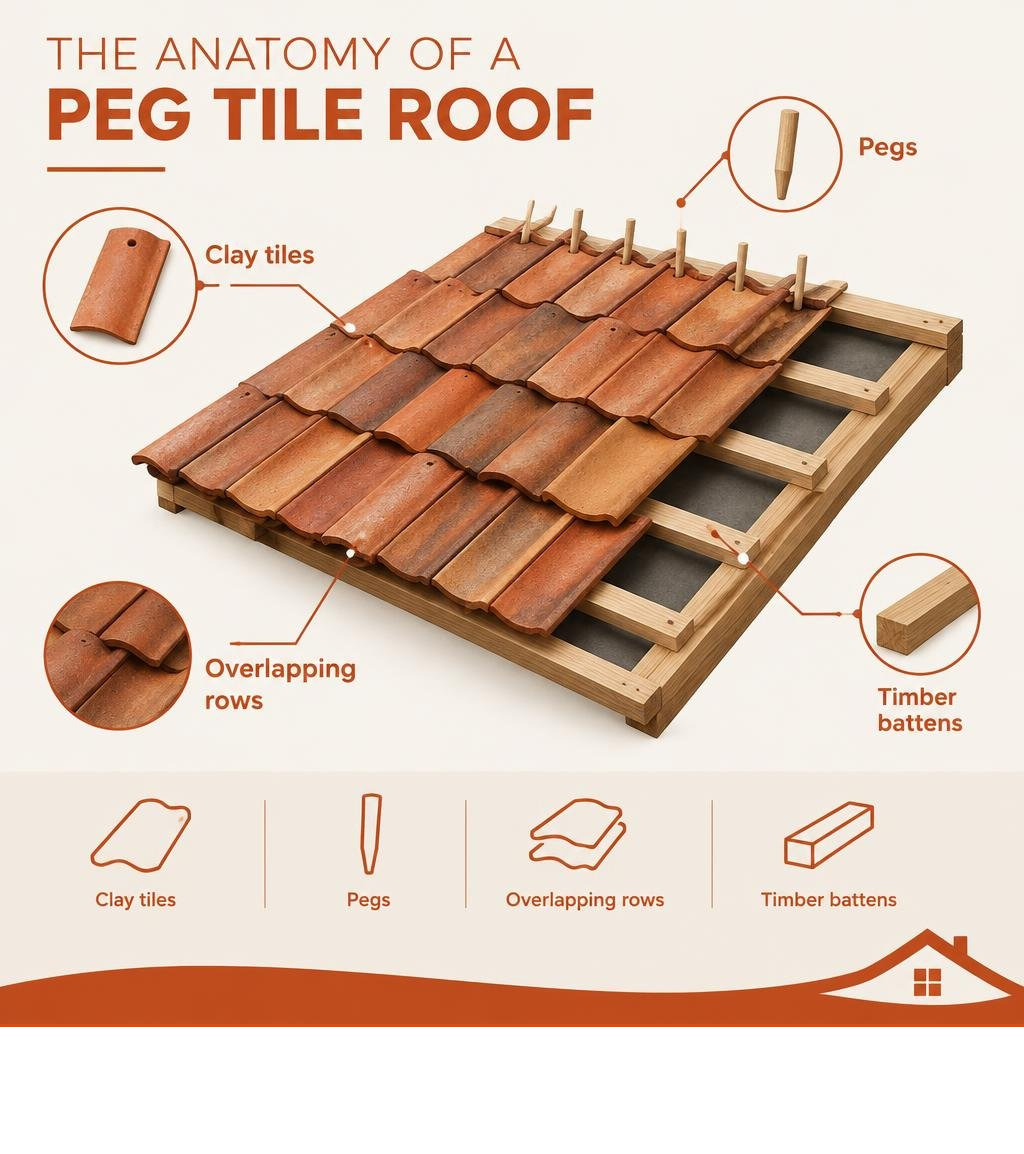
A peg tile roof uses small clay tiles with holes near the top. Pegs hold the tiles on timber battens, while overlapping rows help shed rain. The tiles’ slight curves and varied colors give the roof its traditional look.
For a home in Brevard County, FL, the key question is whether that traditional system can be secured for local wind and rain. A roofing professional should assess the roof’s slope, structure, and fixing method before recommending peg tiles for a new roof or repair.
For homeowners comparing traditional clay systems with interlocking profiles, reviewing options for tile roofing in Brevard County can clarify how local wind uplift and moisture factors shape material selection.
What Is a Peg Tile Roof and How Does It Work?
A peg tile roof represents one of the oldest and most enduring methods of clay roofing in architectural history. Unlike modern interlocking systems that snap together or rely on molded nibs to hang from battens, traditional peg tiles are flat, rectangular slabs of kiln-fired clay featuring two punctured holes near the head. They rely on gravity, steep roof geometry, and physical pegs driven through these holes to latch onto horizontal timber battens.
The origin of these handcrafted clay units dates back centuries. While clay tiles were utilized in antiquity—as explored in this guide to classic terracotta tile systems—the standardized flat tile emerged prominently in medieval England. In 1477, the Statute of Edward IV established standard dimensions for plain tiles (historically 10½ inches by 6¼ inches), establishing uniformity for regional roofers.
The secret to weatherproofing a peg tile system lies in double-lap coverage. Because individual tiles lack interlocking side grooves, each row overlaps the course two layers below it. At any given point on a properly laid roof slope, there are three layers of clay protecting the building:
- The exposed surface of the top tile (the gauge).
- The covered midsection of the tile beneath it.
- The upper headlap of the third tile underneath.
This triple-layer barrier creates a dense, highly effective shield against driving rain. Furthermore, handmade peg tiles feature a natural longitudinal and transverse camber (a subtle convex curve). This curvature prevents the tiles from lying completely flat against one another, which promotes capillary drainage and provides natural breathability. Modern conservation guidelines, such as the NFRC fixing recommendations, emphasize that this air circulation helps prevent condensation within the roof structure.
Anatomy of a Peg Tile Roof System
The structural integrity of a traditional peg tile system relies on several core components working in harmony:
- Clay Tiles: Fired in traditional kilns, these tiles possess rich color variegation (ranging from deep terracotta to orange and weathered brown) and subtle surface irregularities that give heritage roofs their distinct character.
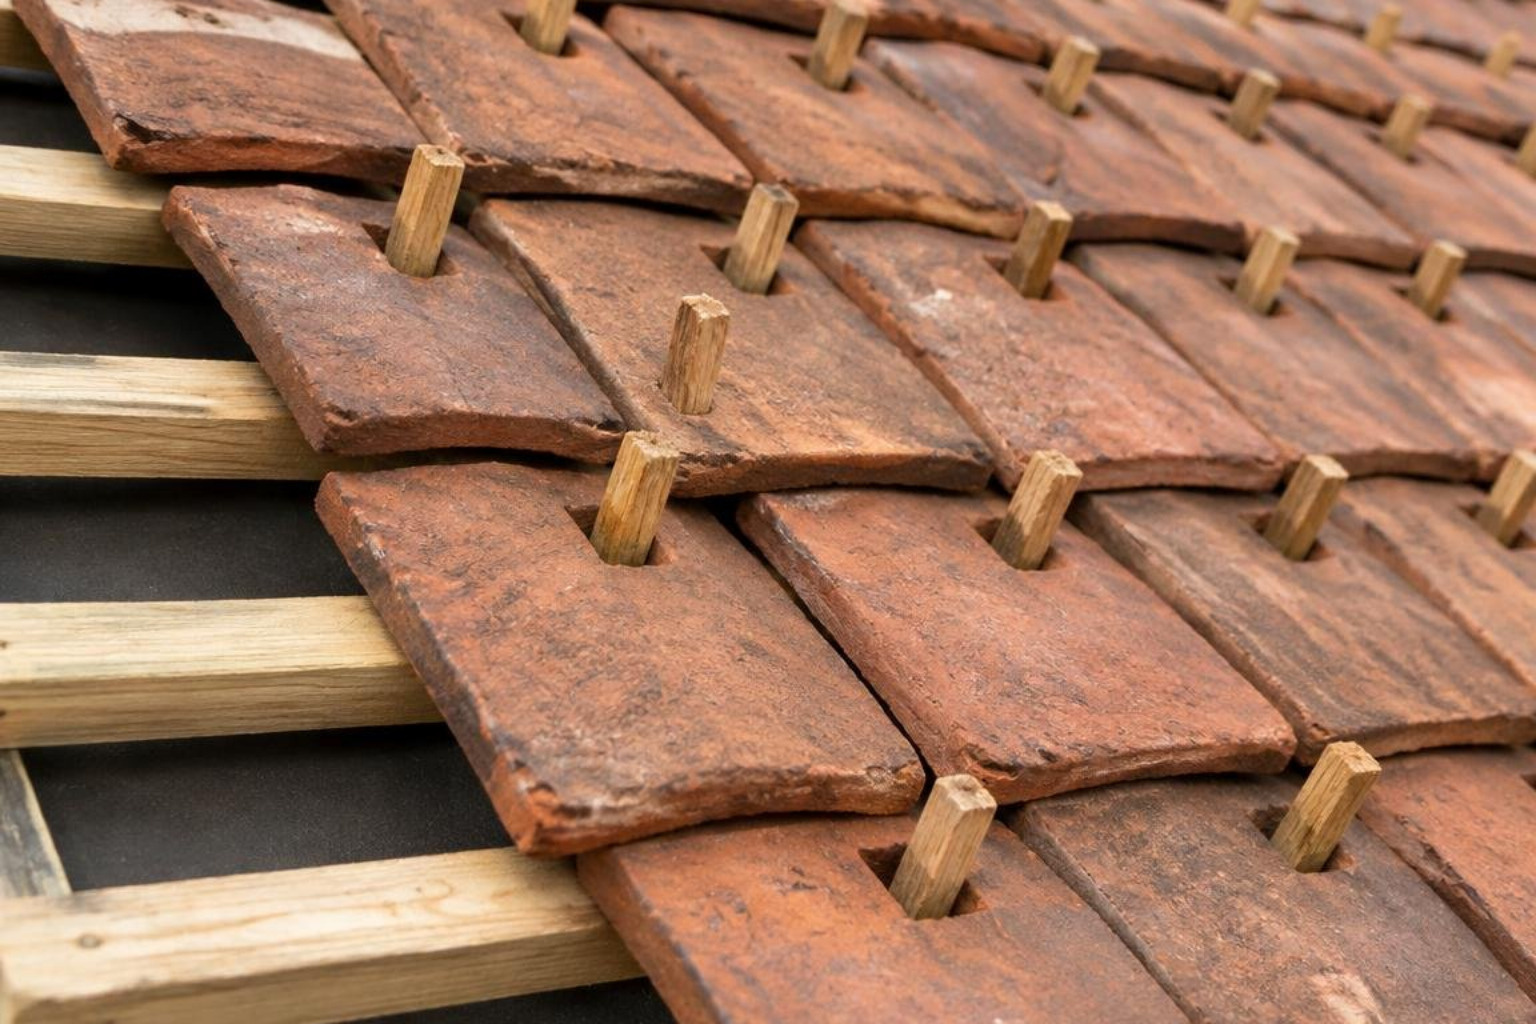
- Dual Peg Holes: Punctured near the top edge, these rectangular or square holes accommodate the fastening pegs.
- Fixing Pegs: Historically, craftsmen used hand-split heartwood oak or sweet chestnut pegs. When exposed to ambient moisture, these seasoned wooden pegs swell slightly, locking themselves firmly into the timber laths. In contemporary restorations, roofers frequently use non-corrosive metal pegs, such as cast aluminium drops or copper alloy fixings, to prevent biological decay.
- Horizontal Battens (Laths): Treated timber battens (typically 38mm x 25mm in modern applications) are spaced precisely across rafters to support the weight and gauge of the tile layout.
Regional Dimensions and Pitch Requirements
Historically, peg tile dimensions varied according to local clay characteristics and regional trade traditions:
- Kent Peg Tiles: Typically measure between 9 to 10 inches long by 6 inches wide (approximately 240mm to 254mm x 152mm).
- Sussex Tiles: Commonly manufactured around 10 inches (250mm) in length.
- Surrey and York Tiles: Frequently larger, with York variants reaching dimensions of up to 12 inches by 8 inches (300mm x 200mm).
Because flat clay tiles depend entirely on gravity and headlap rather than mechanical interlocks, roof pitch is critical. A peg tile roof requires a steep pitch to shed water efficiently. The standard minimum slope is 40 degrees, with 45 to 50 degrees considered optimal.
The headlap—the distance by which a tile overlaps the tile two courses below—must be calculated carefully based on roof pitch and exposure:
- Pitches 45° and Greater: A standard headlap of 60mm to 65mm is typically sufficient.
- Pitches Between 40° and 44°: The headlap must increase to at least 70mm to 75mm to prevent wind-driven rain from creeping past the tile heads.
How to Construct and Install Peg Tiles
Constructing a peg tile roof requires traditional carpentry skills alongside modern waterproofing principles. Before hanging a single tile, a roofing contractor must evaluate the underlying roof structure. Because double-lap clay roofing creates a substantial deadload (often exceeding 15 to 18 pounds per square foot), rafters must be structurally sound and adequately sized to prevent sagging.
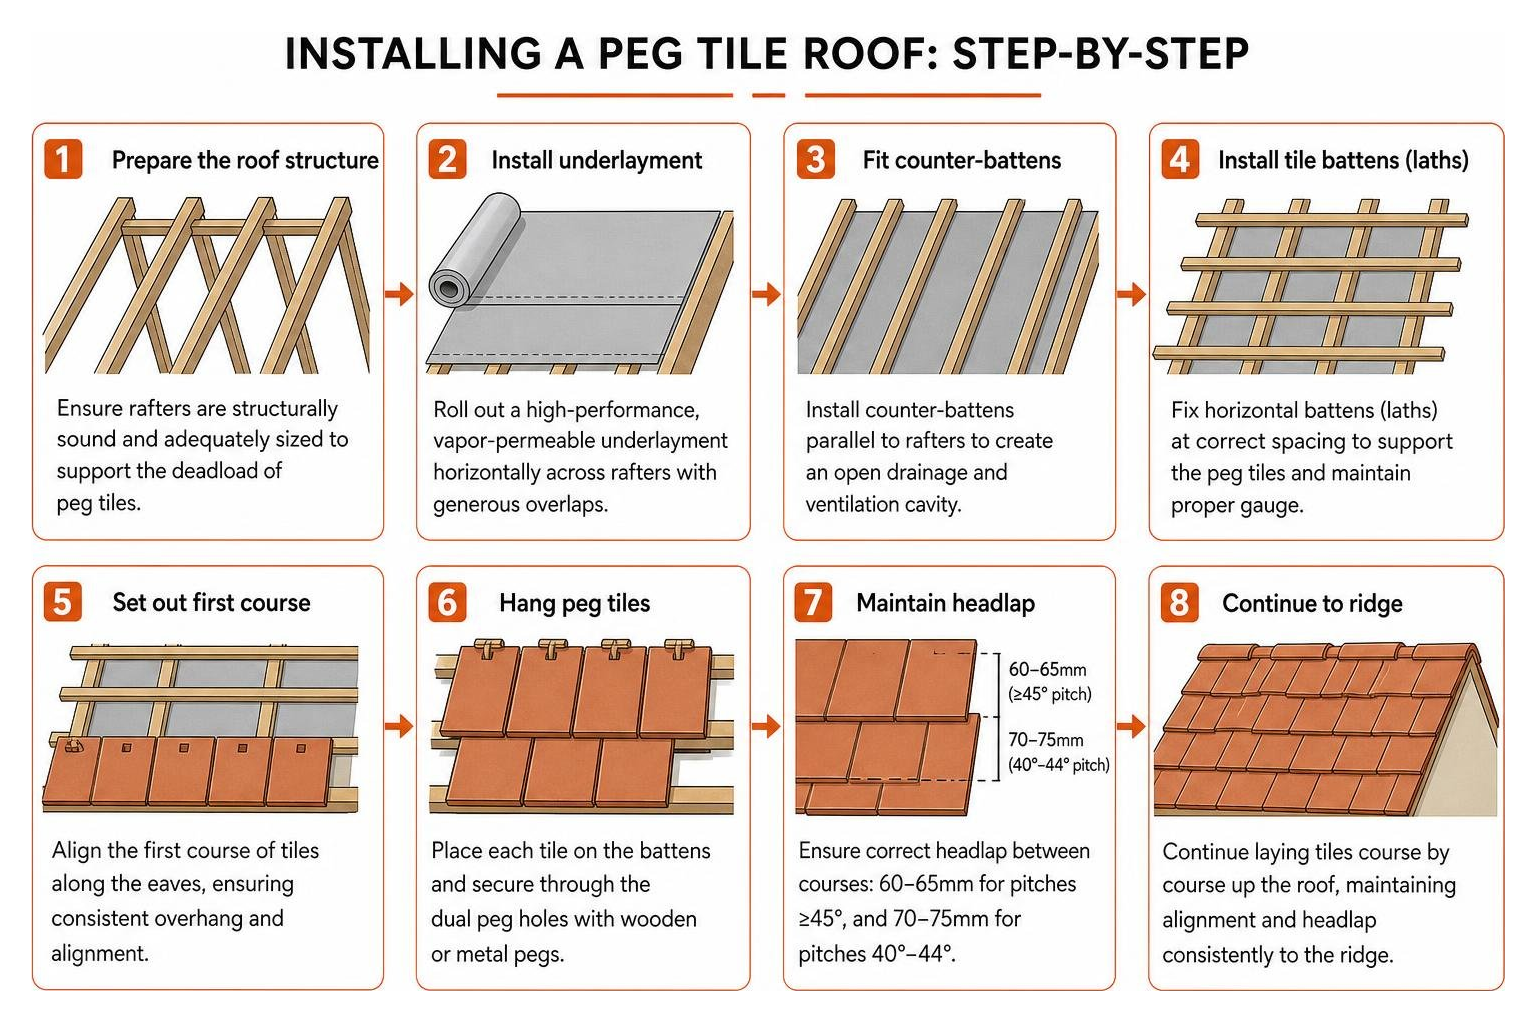
Modern installations pair historic techniques with advanced membranes. A high-performance, vapor-permeable underlayment is rolled horizontally across rafters with generous overlaps. Counter-battens are often installed parallel to the rafters, followed by horizontal tile battens. This creates an open drainage and ventilation cavity beneath the tiles.

Installing a Peg Tile Roof: Step-by-Step
Following established standards—such as those outlined in historical peg tile technical guidance—the installation process follows a precise sequence:
- Setting the Eaves and Tilt Fillet: A timber tilt fillet is fixed along the fascia to ensure the first course of tiles maintains the same angle of pitch as the rest of the roof. An eaves course (shorter under-eaves tiles) is laid first to initiate the double-lap coverage.
- Batten Gauge Layout: Battens are set to a precise gauge (the exposed length of the tile, typically around 3.5 to 4 inches, depending on tile length and required headlap). Straight horizontal chalk lines ensure even coursing from eaves to ridge.
- Inserting the Pegs: Craftsmen insert wooden pegs or modern aluminium drops into the pre-punched holes at the head of each tile.
- Hanging the Courses: Each tile is hand-hung over the top edge of the batten. Tiles are laid in a broken-bond (staggered) pattern so that the joint between two tiles in one course is centered over the solid body of the tile beneath it. When selecting materials, property owners often compare premium architectural tile profiles to determine whether traditional flat peg tiles or modern profiles best match their structural and aesthetic goals.
- Verifying Alignment and Lap: Installers continually check vertical and horizontal sightlines to prevent drift, ensuring the minimum headlap is preserved across valleys, hips, and roof planes.
Mortar Bedding and Flashing Details
Historically, the underside of peg tiles was “torched”—coated with a lime-sand mortar mixed with horsehair—to seal gaps against wind-driven snow and rain while allowing moisture vapor to escape.
In modern installations, mechanical fixings and underlayments manage primary waterproofing, but mortar bedding remains essential for ridge and hip caps:
- Mortar Formulation: A traditional 1:1:6 mix (one part hydraulic lime, one part Portland cement, and six parts sharp sand) provides strength while maintaining the flexibility needed to accommodate thermal movement without cracking.
- Bonnet Hips and Valleys: Intersecting roof planes utilize specialized bonnet hip tiles or purpose-made valley troughs bedded in mortar to direct water away from vulnerable junctions.
- Flashing Integration: Lead or non-corrosive metal flashings are stepped into abutments, chimneys, and parapet walls, ensuring water transitions smoothly onto the tile surface.
Pros, Cons, and Performance Compared to Modern Roofing
Understanding how traditional peg tiles compare to contemporary options helps property owners evaluate their investment.
| Feature / Attribute | Traditional Clay Peg Tile | Modern Concrete Tile | Modern Double Roman Tile |
|---|---|---|---|
| Material Base | 100% Kiln-Fired Natural Clay | Molded Portland Cement & Aggregate | Fired Clay or Extruded Concrete |
| Fixing Method | Gravity, Wooden Pegs, or Aluminium Drops | Molded Nibs + Mechanical Screws/Clips | Molded Nibs + Interlocking Side Laps |
| Coverage Type | Double-Lap (3 Layers at Any Point) | Single-Lap Interlocking | Single-Lap Interlocking |
| Minimum Pitch | 40° to 45° | 15° to 22.5° (depending on underlay) | 17.5° to 25° |
| Estimated Lifespan | 80 to 100+ Years | 40 to 60 Years | 50 to 75 Years |
| Weight per Sq. Ft. | Heavy (approx. 15–18 lbs/sq. ft.) | Moderate to Heavy (9–12 lbs/sq. ft.) | Moderate (8–11 lbs/sq. ft.) |
| Ventilation | Natural Airflow via Camber & Gaps | Requires Dedicated Ridge/Soffit Vents | Requires Mechanical/Batten Vents |
For property owners exploring interlocking alternatives, reviewing the benefits of double roman roof systems provides valuable context on modern single-lap performance.
Advantages of Peg Tiles
- Timeless Aesthetic: Handmade textures, irregular profiles, and natural color variations create architectural character that machine-made alternatives cannot replicate.
- Exceptional Lifespan: High-fired clay resists rot, biological degradation, and UV damage, routinely lasting over a century with proper maintenance.
- Thermal and Acoustic Insulation: The triple-layer density provides natural sound dampening and thermal mass, moderating indoor temperatures.
Disadvantages of Peg Tiles
- Substantial Weight: Requires robust roof framing to support the double-lap system.
- Specialized Labor Costs: Hand-hanging individual peg tiles is labor-intensive and requires skilled craftsmen familiar with heritage methods.
- Steep Pitch Requirement: Ineffective on low-slope applications due to the risk of wind-driven water intrusion.
Maintenance, Common Repairs, and Climate Considerations
While clay tiles themselves can endure for over a century, the supporting components often require maintenance earlier in the roof’s lifespan. In coastal environments across the Space Coast—including Palm Bay, West Melbourne, Rockledge, and Viera—roofs face intense ultraviolet radiation, seasonal tropical storms, and salt-laden air.
Common maintenance issues on peg tile roofs include:
- Peg Deterioration: Historic wooden pegs can eventually rot or shrink, causing individual tiles to slip out of alignment.
- Batten Failure: Older wooden laths can degrade from trapped moisture, requiring localized batten replacement.
- Mortar Spalling: Bedded ridge and hip tiles experience natural thermal expansion, causing mortar joints to crack and crumble over time.
- Wind Uplift: Because traditional peg tiles rely primarily on gravity rather than mechanical screws, extreme wind gusts can dislodge individual units.
Protecting these systems requires periodic evaluation. Homeowners should understand the importance of professional tile roof inspections to detect cracked mortar, shifted tiles, or failing underlayment before leaks impact the home’s interior. In high-sun environments, implementing strategies to protect tile roofing from solar and thermal wear will preserve the underlayment and flashings beneath the clay.
When assessing repair versus replacement, costs vary significantly depending on roof pitch, structural accessibility, underlayment condition, and the availability of matching reclaimed or handmade tiles. When widespread tile slippage occurs alongside deteriorated underlayment, a full reroof with modern secondary water barriers and corrosion-resistant fasteners is generally more cost-effective than repeated spot repairs.
Frequently Asked Questions About Peg Tile Roofing
How long does a traditional peg tile roof last?
High-quality, kiln-fired clay peg tiles can last 80 to 100 years or more. However, the underlying battens, fasteners, and waterproof underlayment typically have a shorter lifespan of 30 to 50 years, requiring the tiles to be stripped, salvaged, and re-hung on fresh battens.
Why are wooden pegs used instead of modern roofing nails?
Historically, hand-split oak or chestnut pegs were used because iron nails rusted quickly in damp climates. Wooden pegs expand when exposed to ambient moisture, wedging themselves tightly into the peg holes without causing the clay to split from overtightening. Modern installations often use corrosion-resistant aluminium alloy drops as a rot-proof alternative.
Can peg tiles be installed on low-pitch roofs?
No. Traditional peg tiles rely on gravity and a steep slope to shed water across their double-lap courses. Installing them on a roof with a pitch lower than 40 degrees creates a high risk of wind-driven water backing up under the tile heads, potentially causing structural leaks.
Conclusion
Traditional peg tile roofing stands as a testament to historic craftsmanship, offering exceptional longevity, natural ventilation, and architectural character. While hand-pegged clay systems require steep roof pitches and skilled labor to construct, their triple-layer coverage provides long-lasting protection against the elements.
For homeowners in Brevard County, FL, building or restoring a home with architectural tile requires careful attention to wind-uplift standards, moisture barriers, and local structural demands. MLG Roofing provides expert inspections, storm damage assessments, and complete residential installations tailored to coastal weather conditions across Melbourne, Cocoa Beach, Satellite Beach, and surrounding communities. To evaluate your roof’s condition or discuss architectural options, consult the specialists in residential tile roofing in Brevard County, FL for a professional property evaluation.